

 Log In
 Register
 Home
Home


 Topic RSS

6:53 pm


NWBA Member
February 17, 2011
 Offline


I've been browsing iforgeiron for a while, and have really been intrigued by the rounding hammers that Brian Brazeal makes. Photo series like this really get me interested: https://plus.google.com/photos/106506050631612810521/albums/5584810784989647425?banner=pwa
There's a great thread there about the tools needed for these: http://www.iforgeiron.com/topi.....e-hammers/
I posted in the thread there, but thought I'd post a bit here as well, (a little "closer to home".)
Last weekend I went up to scout camp to do some cleanup work/logging and managed to sneak some time in at the forge. I decided to start the process of making some of the tools needed for these hammers.
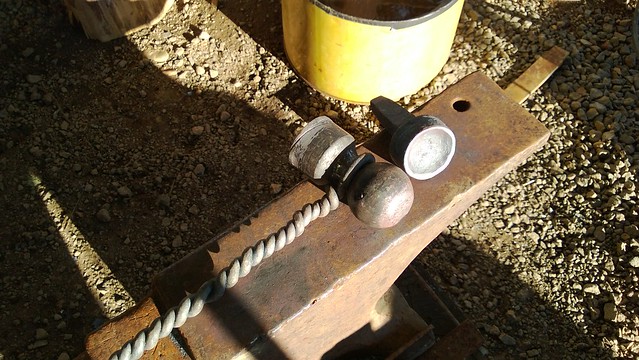
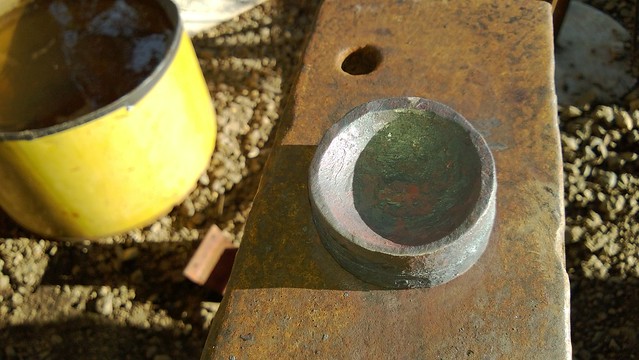
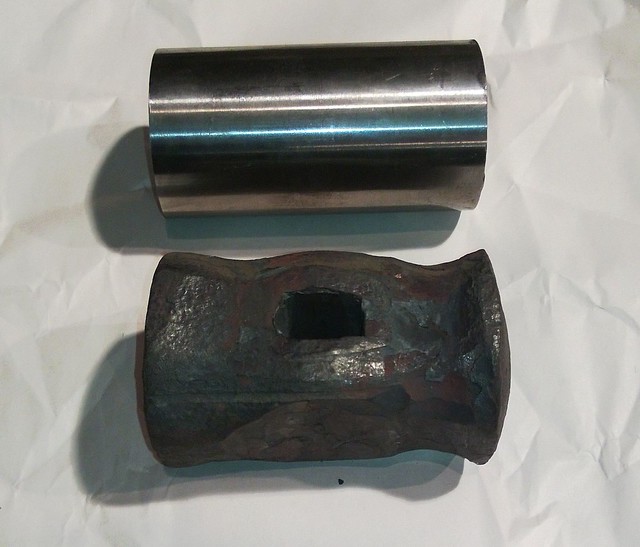
I made a ball tool out of an old trailer hitch with a piece of round stock wrapped around the shaft for a handle. I also made a cupping tool out of a piece of jackhammer shaft. I tapered the end to fit the hardy, cut it off a couple inches above that and upset the end into a round disc. I then worked the edges- first squaring off the sides, then octagon, then round, just like rounding up a square bar. I was happy to see the middle dishing itself out nicely. I was able to get another volunteer to stop by and help me for a few minutes to hold the ball tool while I struck it to even out the cup.
Lessons learned:
1) if I make another tool like this with a jackhammer bit, I won't use one with a collar. While the collar makes an easy edge to set it in the hardy, this is better for something like a hot cut tool. As it was, I managed to get a cold shut when I upset the end into the disk shape, and it pushed up against the collar. Probably not a big deal given the nature of this particular tool, but avoiding shuts is good practice.
2) after upsetting the end, and before working the edges, I should have done some cleanup/planishing blows. There's one spot where the edge of the sledge left a mark that I didn't remove, and this ended up as a mark in the cup. The ball tool removed it a bit, but it's still there. Care will need to be taken when making a hammer face in the cup to ensure I move around to even out the effect of these imperfections.
3) having a striker would have made this whole process a lot easier. As it was, having a helper for a few minutes using the ball tool really made that step go quickly, but the rest of it was pretty time consuming.
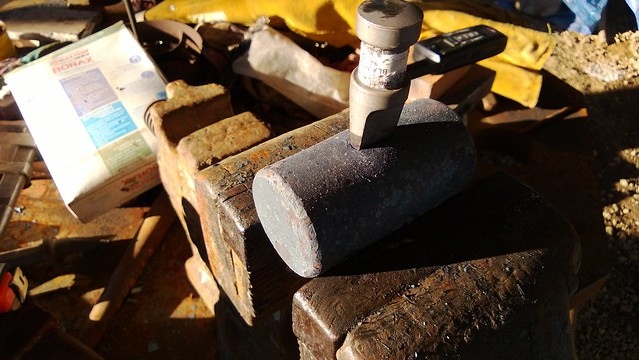
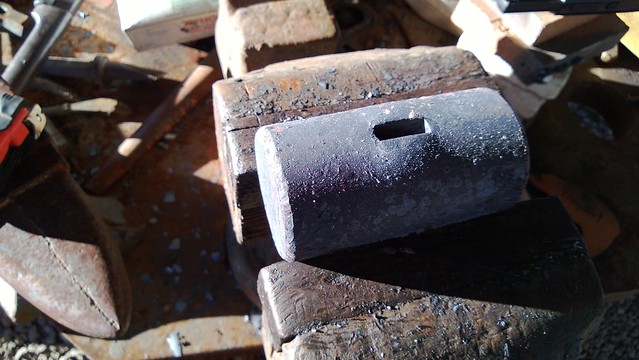
I started punching the eye for the hammer, but stopped after just a little bit. I was having trouble working efficiently without losing too much heat from the steel. (Again, a striker would really have helped here.)
I was only gaining a small distance per heat, and noticed that I was marring the lower portion of the billet on the vise edge. I will try again sometimes when I can have someone help. It probably didn't help that it was a really cold day, and the wind was blowing pretty hard through the smithy. (I think I need to add some canvas tarps that I can roll down on the windward side.)
When I work on this again, I'll make sure to flatten the round stock a bit to keep it from rolling and do it on the anvil face instead of the vise.
anyway, here's the small amount of progress on the eye:

I'm going to bring this stuff to the clubhouse meeting. If there's time and room, I may have a go again there.
--Tracy
2:48 am

NWBA Member
August 7, 2010
Offline
When it is cold, drill 3 - 1/4" pilot holes, on center. The punch will follow the pilot holes every time. If you are concerned about marking the radius of the material, take a piece of 1/2 to 3/4 flat bar, heat it and drive the cold hammer stock into it to make a saddle to support the hammer head. cut a hole in the saddle so the punch can go through.
The result is worth the sweat!!
Neil
As long as we are above our shoes, We know where we are.:happy:
6:02 pm
NWBA Member
February 17, 2011
Offline
Neil Gustafson;17432 wrote: When it is cold, drill 3 - 1/4" pilot holes, on center. The punch will follow the pilot holes every time. If you are concerned about marking the radius of the material, take a piece of 1/2 to 3/4 flat bar, heat it and drive the cold hammer stock into it to make a saddle to support the hammer head. cut a hole in the saddle so the punch can go through.
The result is worth the sweat!!
Neil
I've heard a few folks mention drilling pilot holes in thick material. My concern is that it could create cold shuts at the gaps between the holes. Am I worrying too much?
5:07 am

NWBA Member
November 8, 2010
Offline
Brian indeed did us a big favor introducing his methods of making a rounding hammer. I finally solved it but in a different way, with a power hammer and press. I have several old rounding or turning hammers- Heller, Champion, Cliff Carrol and a no-name that all have the super thin cheeks and 2+ inch faces- love them all~. After studying it for awhile and reverse forging them in my head, I feel I came pretty close. For my eye punch I used a piece of gorilla bar, already ovalized. Another requisite is a verrrry long drift, as pictured in the series of pictures from Brian's class. It keeps your hands away from the heat when fullering out the cheeks whether manually or with power. I think you could do without the old school fullers (separate top and bottom) and make a spring fuller for deliniating the heads as well, no striker needed.
They only remember you when you SCREW UP~!!!
3:37 am

NWBA Member
June 8, 2010
Offline
Steve H;17447 wrote: Brian indeed did us a big favor introducing his methods of making a rounding hammer. I finally solved it but in a different way, with a power hammer and press. I have several old rounding or turning hammers- Heller, Champion, Cliff Carrol and a no-name that all have the super thin cheeks and 2+ inch faces- love them all~. After studying it for awhile and reverse forging them in my head, I feel I came pretty close. For my eye punch I used a piece of gorilla bar, already ovalized. Another requisite is a verrrry long drift, as pictured in the series of pictures from Brian's class. It keeps your hands away from the heat when fullering out the cheeks whether manually or with power. I think you could do without the old school fullers (separate top and bottom) and make a spring fuller for deliniating the heads as well, no striker needed.
Steve:
Wotinell is "Gorilla bar"???:unsure::unsure::unsure:
3:38 am
NWBA Member
June 8, 2010
Offline
Neil Gustafson;17432 wrote: When it is cold, drill 3 - 1/4" pilot holes, on center. The punch will follow the pilot holes every time. If you are concerned about marking the radius of the material, take a piece of 1/2 to 3/4 flat bar, heat it and drive the cold hammer stock into it to make a saddle to support the hammer head. cut a hole in the saddle so the punch can go through.
The result is worth the sweat!!
Neil
Thanks, Neil!!!:spin: I've used this trick and it works GREAT!!!:bounce::bounce::bounce:
3:42 am
NWBA Member
June 8, 2010
Offline
Tracy Lauricella;17424 wrote:
I'm going to bring this stuff to the clubhouse meeting. If there's time and room, I may have a go again there.
--Tracy
Tracy, sure was fun to watch you and the boys forging this hammer head at the hammer-in today!!! Good job!!:D Couldn't tell you "didn't know what you were doing".:bounce::bounce:
5:14 am
NWBA Member
February 17, 2011
Offline
Lynn Gledhill;17459 wrote: Tracy, sure was fun to watch you and the boys forging this hammer head at the hammer-in today!!! Good job!!:D Couldn't tell you "didn't know what you were doing".:bounce::bounce:
Thanks Lynn. I had a good time with it- some trial & error involved to be sure, but progress was made.
I definitely need to get the steel hotter than I was getting it though- even when I had one of the guys swinging a sledge, it didn't move as much as I'd like.
I'm going to be going back up to scout camp on the 8th, and I've got a 2-burner forge there that should make it easy to get this sucker good and hot.
Here's a couple pics of what we got done today:

We punched the eye and drifted it partway. (I didn't want to go up to the final size yet; I'll drift it up when the rest of it is done.)
One side has been upset and flattened and the other upset and rounded. I found very quickly that my cupping tool was too small for this size hammer, so we switched to the dishing block (cut off oxy tank bottom) and that seemed to work well.
I've started fullering out one face, but it was really slow going. Perhaps my big dual-burner forge will have better luck getting it hot enough (or as I mentioned today, maybe I just need to be more patient. 🙂 )
I'll leave off with one last pic for today- this one has a Coke can for size reference:

Thanks to everyone that offered suggestions and help today!
--Tracy
5:59 am
NWBA Member
February 17, 2011
Offline
Lynn Gledhill;17457 wrote: Steve:
Wotinell is "Gorilla bar"???:unsure::unsure::unsure:
I think it's a type of crowbar, maybe Steve can clarify.
Either that or it's a place that serves a lot of banana margaritas. 😉
7:00 pm
NWBA Member
November 8, 2010
Offline
Those are looking good, Tracy!
Yes- A gorilla bar is a crowbar with an oval shaped cross-section. I made a 1-shot punch and bolster set up with the oval punch as well as one in round.
I've been discovering I don't need to use all air hardening steels for punches if you get them out of the heat in time.
Look up my thread on 'test punch' here http://blacksmith.org/forums/t.....unch/page3 to see the results. Again, slightly different than Brians' methods but it got where I wanted to go
They only remember you when you SCREW UP~!!!
2:47 am
NWBA Member
February 17, 2011
Offline
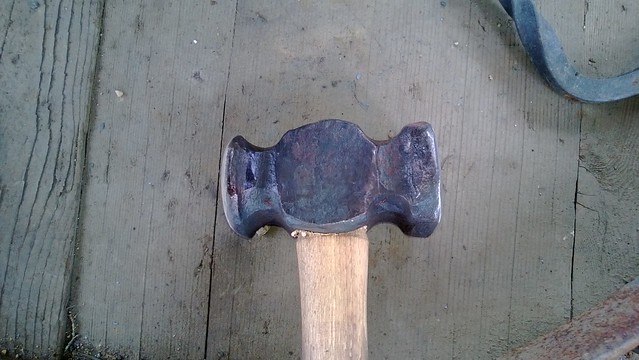
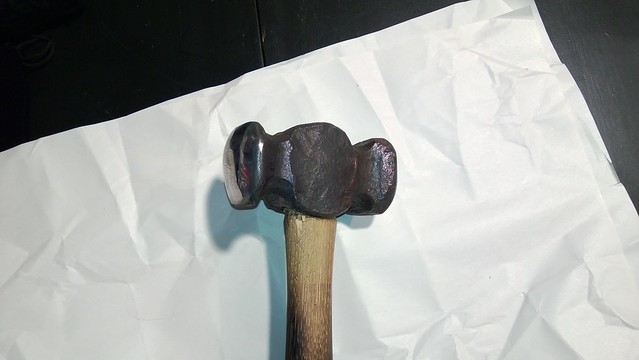
Well, I finished the first hammer. I say "first" since I plan to take what I've learned from this one and make more. It turned out ok, particularly since I was mostly just looking at pictures of what others have done in order to make it.
On the next one, I'll concentrate a bit more on symmetry, and remember to use bolsters every time I put the drift through. There were a few times when I was putting the drift through just to use as a handle, and ended up knocking flats on the edges of the faces.
I've got a temporary, store bought hammer-handle on it now, but I'm planning to make my own handle to go on it. (I'm considering forging a drawknife first, then using the drawknife to make the handle)
Final weight came out at 3.3 lbs.
Here it is:
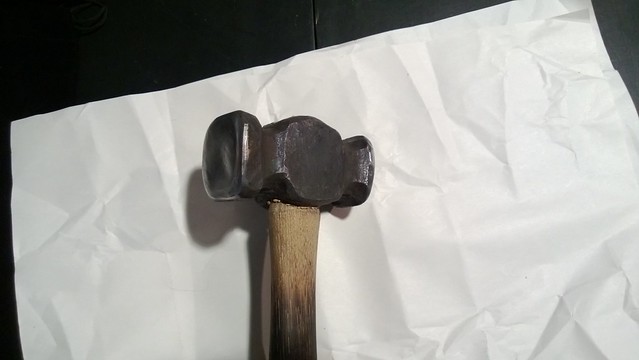
What do you think? What should I do differently on the next one?
Thanks,
--Tracy
3:02 am
NWBA Member
June 8, 2010
Offline
Tracy Lauricella;17519 wrote:
I've got a temporary, store bought hammer-handle on it now, but I'm planning to make my own handle to go on it. (I'm considering forging a drawknife first, then using the drawknife to make the handle)
Final weight came out at 3.3 lbs.
Here it is:
What do you think? What should I do differently on the next one?
Thanks,
--Tracy
Beautiful for a first try!!!:bounce::bounce:
4:16 am
NWBA Member
August 7, 2010
Offline
I don't think that it is a "TRY". I think it is a "DONE GOOD" It is twice as good as the one you had before!!;):)
Don't look too far for handle material, Lots of pallets are made out of great material. They throw them out everyday!!! Already seasoned, pick the wood you want. Cut out a piece with the grain you want and have about twenty spares!!
Neil
As long as we are above our shoes, We know where we are.:happy:
6:28 pm
NWBA Member
February 17, 2011
Offline
Neil Gustafson;17521 wrote: I don't think that it is a "TRY". I think it is a "DONE GOOD" It is twice as good as the one you had before!!;):)
Don't look too far for handle material, Lots of pallets are made out of great material. They throw them out everyday!!! Already seasoned, pick the wood you want. Cut out a piece with the grain you want and have about twenty spares!!
Neil
Oh, great idea on the pallets, I'll do some scrounging. I have been growing to like rectangular hammer handles with radiused corners, like you see on Hofi's hammers.
12:15 am
NWBA Member
January 19, 2011
Offline
Tracy Lauricella;17522 wrote: Oh, great idea on the pallets, I'll do some scrounging. I have been growing to like rectangular hammer handles with radiused corners, like you see on Hofi's hammers.
Hi Tracy great job on the hammer it looks good. Hope to see you at hammer in. As far as makeing handles get a side hatchet you can get real close with it and then go to draw knife. I will try to bring one to show you. Good job on handle and hammer. Bill Apple
2:37 am
NWBA Member
February 17, 2011
Offline
bill apple;17523 wrote: Hi Tracy great job on the hammer it looks good. Hope to see you at hammer in. As far as makeing handles get a side hatchet you can get real close with it and then go to draw knife. I will try to bring one to show you. Good job on handle and hammer. Bill Apple
Thanks Bill, I'll be there at the clubhouse meeting. I'm still planning to come down early with the guys and help set up.
I've not heard of a side hatchet before, I'd like to see one. Is it basically a hatchet with the bevel only on one side?
Thanks,
--Tracy
3:45 pm
NWBA Member
April 19, 2010
Offline
The only thing you need to do different with the second one is send it to my house. Looks great to me!!!!
5:48 pm
NWBA Member
February 17, 2011
Offline
Eric Sprado;17525 wrote: The only thing you need to do different with the second one is send it to my house. Looks great to me!!!!
Thanks Eric! I think we all tend to be very critical of our own work. I can see lots of flaws in this one. I remember Jerry Culberson saying "when you want to learn to make something well, make 50 of them, and keep the good one. Do that until you have 50 good ones."
I don't know if I'm going to make that many, but there is certainly some value in iterating on the same design to get better at it and learn from your mistakes.
Right now my list of things to do better next time includes:
1) a larger cupping tool. The one I made is too small. The swages at the clubhouse made from the bottoms of old oxygen tanks worked well, but I'd like to make one that will fit in a hardy.
2) larger spring swage. I did some of this using a top and bottom fuller, then did the remainder on a spring swage I made. However the spring swage was about 3/4" round. A larger radius fuller would be more appropriate.
3) start both fullers the same distance from the hole. I did the flat side closer to the eye, and it came out a little nicer/thicker.
4) use bolsters every single time I put the drift through, even if I'm just lightly tapping it into the eye to use as a handle. Otherwise the bottom edges of the faces get impacted on the anvil face.
5) either build a hardy block or use one of the railroad anvils when flattening the cheeks. Similar to point #4, it's easy to impact the sides of the faces on the anvil when working the cheeks down. I used the corner of the anvil & the horn when I realized this was happening, but a 2" wide flat surface would work even better.
7:11 pm
NWBA Member
February 17, 2011
Offline
Well, I decided I need to learn from a pro on how to do this, and some opportunities are too good to pass up.
I'll be visiting Brian Brazeal at his place in Mississippi for a week in May to learn these techniques "direct from the source" so to speak. 🙂
Needless to say, I'm excited!

Most Users Ever Online: 668
Currently Online:
16 Guest(s)
Currently Browsing this Page:
1 Guest(s)
Top Posters:
Larry L: 1566
Grant: 1420
Bruce Macmillan: 625
Lee Cordochorea: 595
Lynn Gledhill: 572
JNewman: 520
Gene C: 504
J Wilson: 426
Eric Sprado: 383
Tom Allyn: 340
Member Stats:
Guest Posters: 22
Members: 8725
Moderators: 4
Admins: 1
Forum Stats:
Groups: 23
Forums: 97
Topics: 3538
Posts: 20289
Newest Members:
churndashmaven, cameliacity, fred.f.chopin, RuoYi, rodeoneerer, NWBABjorn, mddangelo, Nevillberger, Crusty Veteran, redwoodforgeoaklandModerators: Steve McGrew: 77, N.W.B.A.: 72, webmaster: 0, bluehost: 0
Administrators: admin: 540
 Usage Policy